EOS에 Smart Contract 생성해보기
in Blockchain
2018년 09월 eos가 많이 업데이트 되었습니다.
현재 버전에서 돌아가는 tutorial은 이 포스트를 참고해주세요.
EOS tutorial for mac
2018년 02월 07일 기준으로 eos의 master 브랜치가 많은 업데이트를 하고 있다. master에서는 제대로 진행할 수 없기 때문에 dawn-2.x 브랜치로 변경해서 진행했다.
참고로 지금 eos testnet에 dawn-2.x 브랜치에서 빌드한 smart contract만 올라간다. master 브랜치에서 작업해서는 testnet에 붙일 수 없다.
Download source code
eos는 c++ 기반이고 mac에서는 llvm 컴파일러를 사용하니까 우선 xcode를 업데이트 해주자
$ xcode-select --install
$ ruby -e "$(curl -fsSL https://raw.githubusercontent.com/Homebrew/install/master/install)"
이제 소스코드를 받자. git clone 후에 branch를 변경해준다. 그리고 build 스크립트를 실행하자.
$ git clone https://github.com/eosio/eos --recursive

$ cd eos
$ git checkout dawn-2.x
$ ./build.sh darwin
build 스크립트 실행 후에 eos/build/programs에 eosd, eosc, eos-walletd 폴더 등을 볼 수 있다. 폴더 안에는 각 프로그램의 executable이 있다. eos에서 사용가능한 프로그램은 다음과 같다.
- eosd: server-side blockchain node component
- eosc: command line interface to interact with the blockchain
- eoswd: EOS wallet
- eosio-launcher: application for nodes network composing and deployment; more on eosio-launcher
Run eosd
이제 eosd를 실행해보자.
$ cd build/programs/eosd
$ ./eosd

2725247ms            main.cpp:65                   main                 ] Throw location unknown (consider using BOOST_THROW_EXCEPTION)
Dynamic exception type: boost::exception_detail::clone_impl<boost::exception_detail::error_info_injector<boost::program_options::invalid_option_value> >
std::exception::what: the argument for option 'genesis-json' is invalid
아마 genesis-json 파일이 없다며 실행이 안될 것이다. genesis-json 파일 경로를 --genesis-json arg로 넣을 수 있다. 우선 genesis.json 파일을 data-dir 폴더로 옮기자. genesis.json 파일은 /eos/build 폴더에 있다.(안옮겨도 된다)
$ cp ../../genesis.json data-dir
$ vi data-dir/config.ini
파일 복사 후 config.ini 파일을 아래와 같이 수정하자. enable-stale-production은 기존 config.ini에 있으므로 수정하고 나머지는 추가해준다.
# Enable production on a stale chain, since a single-node test chain is pretty much always stale
enable-stale-production = true
# Enable block production with the testnet producers
producer-name = inita
producer-name = initb
producer-name = initc
producer-name = initd
producer-name = inite
producer-name = initf
producer-name = initg
producer-name = inith
producer-name = initi
producer-name = initj
producer-name = initk
producer-name = initl
producer-name = initm
producer-name = initn
producer-name = inito
producer-name = initp
producer-name = initq
producer-name = initr
producer-name = inits
producer-name = initt
producer-name = initu
# Load the block producer plugin, so you can produce blocks
plugin = eosio::producer_plugin
# Wallet plugin
plugin = eosio::wallet_api_plugin
# As well as API and HTTP plugins
plugin = eosio::chain_api_plugin
plugin = eosio::http_plugin
이제 eosd를 --genesis-json 옵션과 함께 다시 실행해보자.
$ ./eosd --genesis-json data-dir/genesis.json

...

******************************
*                             *
*   ------ NEW CHAIN ------   *
*   -   Welcome to EOS!   -   *
*   -----------------------   *
*                             *
*******************************

Your genesis seems to have an old timestamp
Please consider using the --genesis-timestamp option to give your genesis a recent timestamp

3348334ms            producer_plugin.cpp:196       plugin_startup       ] producer plugin:  plugin_startup() end
3348334ms            http_plugin.cpp:153           plugin_startup       ] start processing http thread
...

3349006ms            chain_controller.cpp:208      _push_block          ] initt #1 @2018-02-07T09:55:49  | 0 trx, 0 pending, exectime_ms=0
3349006ms            producer_plugin.cpp:246       block_production_loo ] initt generated block #1 @ 2018-02-07T09:55:49 with 0 trxs  0 pending
3350006ms            chain_controller.cpp:208      _push_block          ] initc #2 @2018-02-07T09:55:50  | 0 trx, 0 pending, exectime_ms=0
3350006ms            producer_plugin.cpp:246       block_production_loo ] initc generated block #2 @ 2018-02-07T09:55:50 with 0 trxs  0 pending
잘 진행했다면 에러 없이 genesis.json에 정의된 블럭들이 생성될 것이다. 참고로 이 후에 진행되는 모든 프로세스는 이 eosd를 실행한 상태여야 한다.
Create wallet
이제 wallet을 만들어보자. eosc 폴더로 이동 후 아래 명령어를 입력한다.
$ cd ../eosc
$ ./eosc wallet create
Creating wallet: default
Save password to use in the future to unlock this wallet.
Without password imported keys will not be retrievable.
"PW5K....58Cq"
default wallet이 생성되고 private key가 나온다. 이 key는 잃어버리지 말자.
-n 옵션과 함께 wallet 이름도 설정할 수 있다.
$ ./eosc wallet create -n tak
Creating wallet: tak
Save password to use in the future to unlock this wallet.
Without password imported keys will not be retrievable.
"PW5J....ttSA"
eosc wallet list 명령어로 현재 갖고 있는 지갑을 확인할 수 있다.
$ ./eosc wallet list
Wallets:
[
  "default *",
  "tak *"
]
여기서 중요한 점은 각 지갑들이 asterisk(*)로 표시되고 있다는 점이다. 처음으로 지갑을 만들 경우에는 기본적으로 unlock된 상태이다. 지갑들은 보안을 위해 lock, unlock 상태가 될 수 있다. 자세한 내용은 creating-and-managing-wallets을 참고하자.
Create EOS key
wallet을 만들었으니 eos key도 생성해보자. 두 개의 키쌍을 만든다.
$ ./eosc create key
Private key: 5KGJ....zQKJ
Public key: EOS6....tfEm

$ ./eosc create key
Private key: 5Ki7....Bydk
Public key: EOS5....Jbpb
위에서 만든 두 키쌍을 default wallet에 import해보자. private key를 임포트해야한다.
$ ./eosc wallet import 5KGJ....zQKJ
$ ./eosc wallet import 5Ki7....Bydk

# import된 key 확인
$ ./eosc wallet keys
[[
    "EOS5....Jbpb",
    "5Ki7....Bydk"
  ],[
    "EOS6....tfEm",
    "5KGJ....zQKJ"
  ]
]
Create EOS Account
create account의 기본 인자는 다음과 같다.
$ eosc create account inita ${desired_account_name} ${public_key_1} ${public_key_2}
eos wiki에는 다음과 같이 소개되어 있다.
initais the name of the account name that will fund the account creation, and subsequently the new account.desired_account_nameis the name of the account you would like to createpublic_key_1andpublic_key_2are public keys, the first one will be permissioned as the owner authority of your account, and the second one will be permissioned for the active authority of your account.
두 개의 키 쌍을 만들고 import 했으므로 이 키 쌍들을 쓰자.
$ eosc create account inita tak EOS5....Jbpb EOS6....tfEm

1623671ms            main.cpp:1195                 main                 ] Failed with error: Assert Exception (10)
status_code == 200: Error code 401
: {"code":401,"message":"UnAuthorized","details":"signatures do not satisfy declared authorizations (3030002)\nTransaction declares authority '{\"account\":\"inita\",\"permission\":\"active\"}', but does not have signatures for it.\n"}
한번에 되면 이상하다. 우선 eosd를 --skip-transaction-signatures 옵션을 주고 실행해보자.
$ ./eosd --skip-transaction-signatures --genesis-json data-dir/genesis.json
eosd를 다시 시작하면 wallet이 lock 상태가 된다. 이 wallet 들을 다시 open 후에 unlock 시켜줘야 한다.
$ ./eosc wallet list
Wallets:
[]

# open wallet
$ ./eosc wallet open -n tak
$ ./eosc wallet open

# unlock wallet
$ ./eosc wallet unlock -n tak
password:
$ ./eosc wallet unlock
password:
이제 준비가 되었으므로 다시 account를 만들어보자. account를 만들 때도 --skip-signature 또는 -s 옵션을 주자.
$ ./eosc create account inita tak EOS5....Jbpb EOS6....tfEm -s
{
  "transaction_id": "5bc1f32e836623f3cc5aaaca39d58f7fb78919f4bf3573207e4dbdba53b2f6d8",
  "processed": {
    "ref_block_num": 2116,
    "ref_block_prefix": 4126678765,
    "expiration": "2018-02-07T10:34:01",
    "scope": [
      "eos",
      "inita"
    ],
    "signatures": [],
    "messages": [{
        "code": "eos",
        "type": "newaccount",
        "authorization": [{
            "account": "inita",
            "permission": "active"
          }
        ],
        "data": {
          "creator": "inita",
          "name": "tak",
          "owner": {
            "threshold": 1,
            "keys": [{
                "key": "EOS5....Jbpb",
                "weight": 1
              }
            ],
            "accounts": []
          },
          "active": {
            "threshold": 1,
            "keys": [{
                "key": "EOS6....tfEm",
                "weight": 1
              }
            ],
            "accounts": []
          },
          "recovery": {
            "threshold": 1,
            "keys": [],
            "accounts": [{
                "permission": {
                  "account": "inita",
                  "permission": "active"
                },
                "weight": 1
              }
            ]
          },
          "deposit": "0.0001 EOS"
        },
        "hex_data": "000000000093dd74000000000000a0c9010000000102477616a2b613e08f032714bdcb086bc8e1970699180a84719800c53a484e173801000001000000010305085e00ce3f5fda0c27ad8d67978e7a1eb0c6c65288ffc5dd0f827daa2e48d0010000010000000001000000000093dd7400000000a8ed32320100010000000000000004454f5300000000"
      }
    ],
    "output": [{
        "notify": [],
        "deferred_trxs": []
      }
    ]
  }
}
됐다. 계정이 만들어졌다.
이제 계정에 대한 정보를 확인할 수 있다.
$ ./eosc get account tak
{
  "account_name": "tak",
  "eos_balance": "0.0000 EOS",
  "staked_balance": "0.0001 EOS",
  "unstaking_balance": "0.0000 EOS",
  "last_unstaking_time": "2106-02-07T06:28:15",
  "permissions": [{
      "perm_name": "active",
      "parent": "owner",
      "required_auth": {
        "threshold": 1,
        "keys": [{
            "key": "EOS6....tfEm",
            "weight": 1
          }
        ],
        "accounts": []
      }
    },{
      "perm_name": "owner",
      "parent": "",
      "required_auth": {
        "threshold": 1,
        "keys": [{
            "key": "EOS5....Jbpb",
            "weight": 1
          }
        ],
        "accounts": []
      }
    }
  ]
}
아래처럼 계정에 대한 code를 확인할 수 있는데, hash 값이 0이라는 건 해당 계정에 아무런 contract가 없다는 뜻이다. 아마 ./eosc set contract tak some.wast some.abi 명령어로 contract를 올리게 되면 hash 값이 바뀔 것 같다.
$ ./eosc get code tak
code hash: 0000000000000000000000000000000000000000000000000000000000000000
Smart Contract “Hello world”
이제 hello world를 찍는 contract를 작성해보자. eos는 eoscpp라는 일종의 부트스트랩 툴을 만들어놨다. eoscpp의 실행파일은 eos/build/tools에 있다.
$ cd ~/workspace/eos/build/tools
$ ./eoscpp -n helloworld
cp: /Users/tak/workspace/eos/build/install/share/skeleton/.: No such file or directory
또 파일이 없단다. skeleton 폴더는 eos/contracts/skeleton에 있다.
근본적으로 수정하는 방법은 build 폴더를 다시 make, build 해야 한다. 빨리 만들고 싶으니 그냥 eoscpp 파일 내의 path를 수정하자.
$ vi eoscpp

09 # cp -r ${EOSIO_INSTALL_DIR}/share/skeleton/. $newname
10   cp -r ~/workspace/eos/contracts/skeleton/. $newname
09 라인에 있는 cp -r ${EOSIO_INSTALL_DIR}/share/skeleton/. $newname을 주석처리하고 실제로 skeleton 폴더가 있는 경로로 바꾼다.
다시 ./eoscpp -n helloworld를 실행하면 helloworld 폴더와 함께 아래 파일들이 생성된다.
helloworld.abi helloworld.cpp helloworld.hpp
helloworld.cpp 파일을 까보면 init()과 apply()를 호출하는데, eos 블록체인 상에서 이 두 함수를 가지고 지지고 볶는다. 자세한 내용은 eos wiki를 참고하자.
이제 단순히 hello world를 프린트하는 cpp 파일을 웹어셈블리 텍스트로 컴파일해보자.
$ ./eoscpp -o helloworld/helloworld.wast helloworld/helloworld.cpp

/usr/local/wasm/bin/clang -emit-llvm -O3 --std=c++14 --target=wasm32 -ffreestanding -nostdlib -fno-threadsafe-statics -fno-rtti -fno-exceptions -I /Users/tak/workspace/eos/build/install/include -I helloworld -c helloworld/helloworld.cpp -o /var/folders/v1/dm24cvvs4kb8lxxg6fqhgd440000gn/T/tmp.PwaMVFV7/built/helloworld.cpp
In file included from helloworld/helloworld.cpp:5:
helloworld/helloworld.hpp:5:10: fatal error: 'eoslib/eos.hpp' file not found
#include <eoslib/eos.hpp>
         ^~~~~~~~~~~~~~~~
1 error generated.
한번에 안된다. eos 문서는 참 불친절하다. 간단히 말해서 다시 make 해줘야 한다. 그 전에 빌드할때 필요한 binaryen 등등을 설치해줘야 한다. 꼭 이 페이지에 들어가서 dependency 프로그램을 설치하자.
위의 dependency 프로그램 설치 후, 아래 명령어를 입력하자
$ cd ~/workspace/eos/build && cmake -DBINARYEN_BIN=~/binaryen/bin -DOPENSSL_ROOT_DIR=/usr/local/opt/openssl -DOPENSSL_LIBRARIES=/usr/local/opt/openssl/lib .. && make -j2

...
[100%] Building CXX object tests/CMakeFiles/chain_test.dir/common/main.cpp.o
[100%] Linking CXX executable chain_test
[100%] Built target chain_test
아마 프로그램들이 제대로 설치되었다면 무리 없이 진행되었을 것이다.
그리고 추가적으로 한 가지 더 해야하는 작업이 있다.
build 폴더에 들어가서 sudo make install을 해줘야 한다. 이 내용이 eos 문서에 없어서 삽질 많이 했다. 이걸 안해서 위의 eoscpp skeleton 관련 에러가 나왔다.
$ cd eos/build
$ sudo make install
이제 위에서 진행하려 했던 helloworld.cpp를 wast로 compile 해보자. 아마 잘될 것이다. 참고로 블록체인 상에는 cpp 파일이 아니라 wast 파일을 contract에 붙인다.
$ cd eos/build/tools
$ ./eoscpp -o helloworld/helloworld.wast helloworld/helloworld.cpp

/usr/local/wasm/bin/clang -emit-llvm -O3 --std=c++14 --target=wasm32 -ffreestanding -nostdlib -fno-threadsafe-statics -fno-rtti -fno-exceptions -I /Users/tak/workspace/eos/build/install/include -I helloworld -c helloworld/helloworld.cpp -o /var/folders/v1/dm24cvvs4kb8lxxg6fqhgd440000gn/T/tmp.JW08GyZX/built/helloworld.cpp
이제 helloworld.wast 파일이 생겼을 거고, 이게 smart contract다. 이 파일과 abi 파일을 아까 생성한 tak 계정에 올리자.
abi 파일은 액션, 타입 등이 정의된 파일인데 이 파일도 공부해야 한다. 할게 많다. eosc set contract {your-account} /path/helloworld.wast /path/helloworld.abi 을 실행하자.
$ ./eosc set contract tak ~/workspace/eos/build/tools/helloworld/helloworld.wast ~/workspace/eos/build/tools/helloworld/helloworld.abi
Reading WAST...
Assembling WASM...
Publishing contract...
{
  "transaction_id": "ed4a03bc0c68c84f7076059e5afd1d9e3d9e37d4951f7f0aaaa4a00764b4190b",
  "processed": {
    "ref_block_num": 18596,
    "ref_block_prefix": 323934510,
    "expiration": "2018-02-08T05:38:25",
    "scope": [
      "eos",
      "tak"
    ],
    "signatures": [
      "1f0d41d84673c899a7a974ed1e26f8e2be5edbe08d90295d5d15447834e32438a64d7d46b438702a19971ec7f08fc5ae75ce171ec455f83cb586ac844041776e9e"
    ],
    "messages": [{
        "code": "eos",
        "type": "setcode",
        "authorization": [{
            "account": "tak",
            "permission": "active"
          }
        ],
        "data": {
          "account": "tak",
          "vm_type": 0,
          "vm_version": 0,
          "code": "0061736d0100000001110460017f0060017e0060000060027e7e00021b0203656e76067072696e746e000103656e76067072696e7473000003030202030404017000000503010001071903066d656d6f7279020004696e69740002056170706c7900030a20020600411010010b17004120100120001000413010012001100041c00010010b0b3f050041040b04504000000041100b0d496e697420576f726c64210a000041200b0e48656c6c6f20576f726c643a20000041300b032d3e000041c0000b020a000029046e616d6504067072696e746e0100067072696e7473010004696e697400056170706c790201300131",
          "code_abi": {
            "types": [{
                "new_type_name": "account_name",
                "type": "name"
              }
            ],
            "structs": [{
                "name": "transfer",
                "base": "",
                "fields": {
                  "from": "account_name",
                  "to": "account_name",
                  "amount": "uint64"
                }
              },{
                "name": "account",
                "base": "",
                "fields": {
                  "account": "name",
                  "balance": "uint64"
                }
              }
            ],
            "actions": [{
                "action_name": "transfer",
                "type": "transfer"
              }
            ],
            "tables": [{
                "table_name": "account",
                "index_type": "i64",
                "key_names": [
                  "account"
                ],
                "key_types": [
                  "name"
                ],
                "type": "account"
              }
            ]
          }
        },
        "hex_data": "000000000000a0c90000f1010061736d0100000001110460017f0060017e0060000060027e7e00021b0203656e76067072696e746e000103656e76067072696e7473000003030202030404017000000503010001071903066d656d6f7279020004696e69740002056170706c7900030a20020600411010010b17004120100120001000413010012001100041c00010010b0b3f050041040b04504000000041100b0d496e697420576f726c64210a000041200b0e48656c6c6f20576f726c643a20000041300b032d3e000041c0000b020a000029046e616d6504067072696e746e0100067072696e7473010004696e697400056170706c790201300131010c6163636f756e745f6e616d65046e616d6502087472616e7366657200030466726f6d0c6163636f756e745f6e616d6502746f0c6163636f756e745f6e616d6506616d6f756e740675696e743634076163636f756e740002076163636f756e74046e616d650762616c616e63650675696e74363401000000572d3ccdcd087472616e7366657201000000204f4d11320369363401076163636f756e7401046e616d65076163636f756e74"
      }
    ],
    "output": [{
        "notify": [],
        "deferred_trxs": []
      }
    ]
  }
}
위 contract를 올리면 eosd가 실행된 터미널에서 Init world!가 세 번 프린트되는 것을 확인할 수 있다.
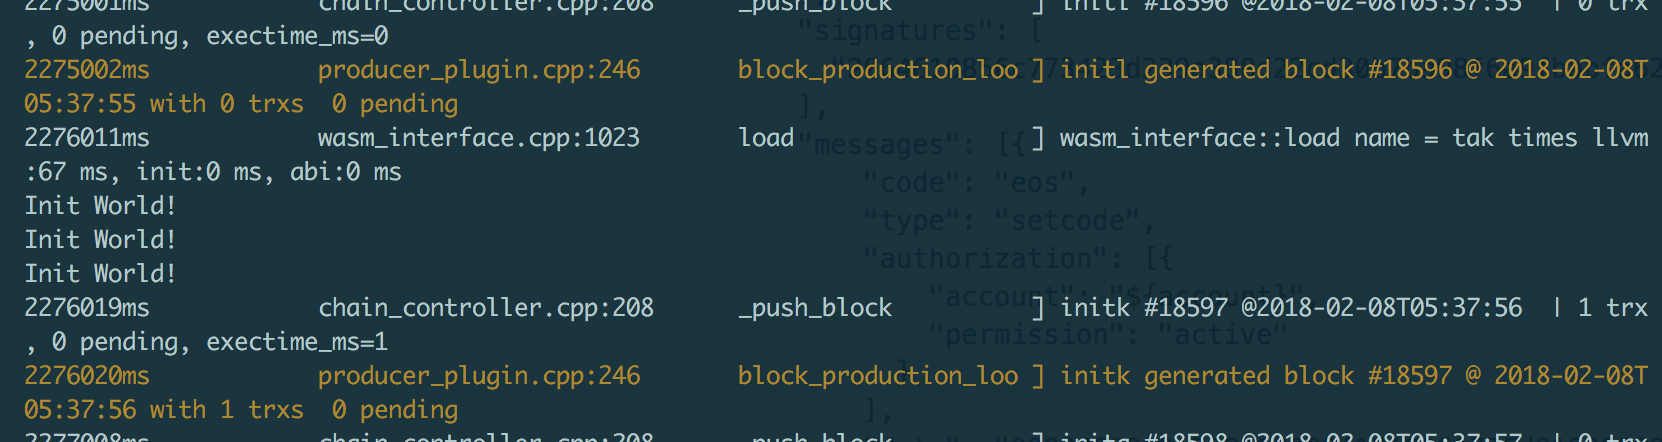
이 세 번의 프린트는 에러가 아니다. eos에서는 아래처럼 설명하고 있다. 자세한 내용은 여기에서 확인 가능하다.
You will notice the lines “Init World!” are executed 3 times. This isn’t a mistake. When the blockchain is processing transactions the following happens:
1st : eosd receives a new transaction (validating transaction)
- creates a temporary session
- attempts to apply the transaction
- succeeds and prints “Init World!” or fails undoes the changes (potentially failing after printing “Init World!”)
2nd : eosd starts to produce a block
- undoes all pending state
- pushes all transactions as it builds the block
- prints “Init World!” a second time
- finishes building the block
- undoes all of the temporary changes while creating block
3rd : eosd pushes the generated block as if it is received it from the network
- prints “Init World!” a third time
이제 아까 확인한 계정 코드 값이 변해 있을 것이다.
$ ./eosc get code tak
code hash: 3d535c4f132928023f9e3ffc761e51cec2ea37720d0e002e6b52fe3c3ad9b936
여기까지가 eos 체인 내에서 ‘hello world’를 찍는 smart contract를 올리는 방법이다.
쉽지 않다.